Understanding Android Lifecycle
Understanding lifecycle events of an Android App is very much essential while developing an Android App. Android lifecycle empowers developers to create efficient, responsive, and stable apps by managing resources effectively, preserving user data, and handling system changes gracefully.
You might have seen various articles/ tutorials on Activity Lifecycle but in the article lets start with the Application Lifecycle first.
What is Application Class and why it is important?
Application class serves as the global entry point for an Android App. It's instantiated before any other component, making it ideal for initialising shared resources, performing global configurations, and managing application-wide state. In latest Android Studio versions when you create an app, the Application Class is not created by default. But if one need they can create their custom Application Class by extending to base Application class.
Creating your custom application class
class YourCustomApplication : Application() {

    override fun onCreate() {
        super.onCreate()
        //on create of application
    }

    override fun onLowMemory() {
        super.onLowMemory()
    }

    override fun onTerminate() {
        super.onTerminate()
    }
}
Let's understand about Application lifecycle:
The lifecycle of Application class is quite simpler in comparison to other components like Activity or Services. This is created when the application process starts. This happens only once for the entire application's lifespan.
The Application class provides only three lifecycle methods:
onCreate(): Called when the application is being created. This is the ideal place for global initialization tasks.onTerminate(): Called when the application is being terminated. However, this method is not guaranteed to be called, as the system can kill the process without prior notice.onLowMemory(): Called when the system is running low on memory. Use this to release unnecessary resources.
We can use this Application class for performing various tasks like:
-
Setting up libraries or frameworks like crash reporting, analytics, or dependency injection.
-
Creating shared preferences or database instances.
-
Initializing network clients or other shared resources.
-
Providing Global Access Points to
SingletonObjects
For smaller apps, you might not need a custom Application class at all. However, as your app grows in complexity, it can become a valuable tool for managing shared resources and global state.
Understanding Activity Lifecycle:
An Android Activity represents a single screen with which a user can interact. Its lifecycle is a series of states it goes through from creation to destruction. Understanding this lifecycle is crucial for building efficient and responsive apps.
Key Lifecycle Methods
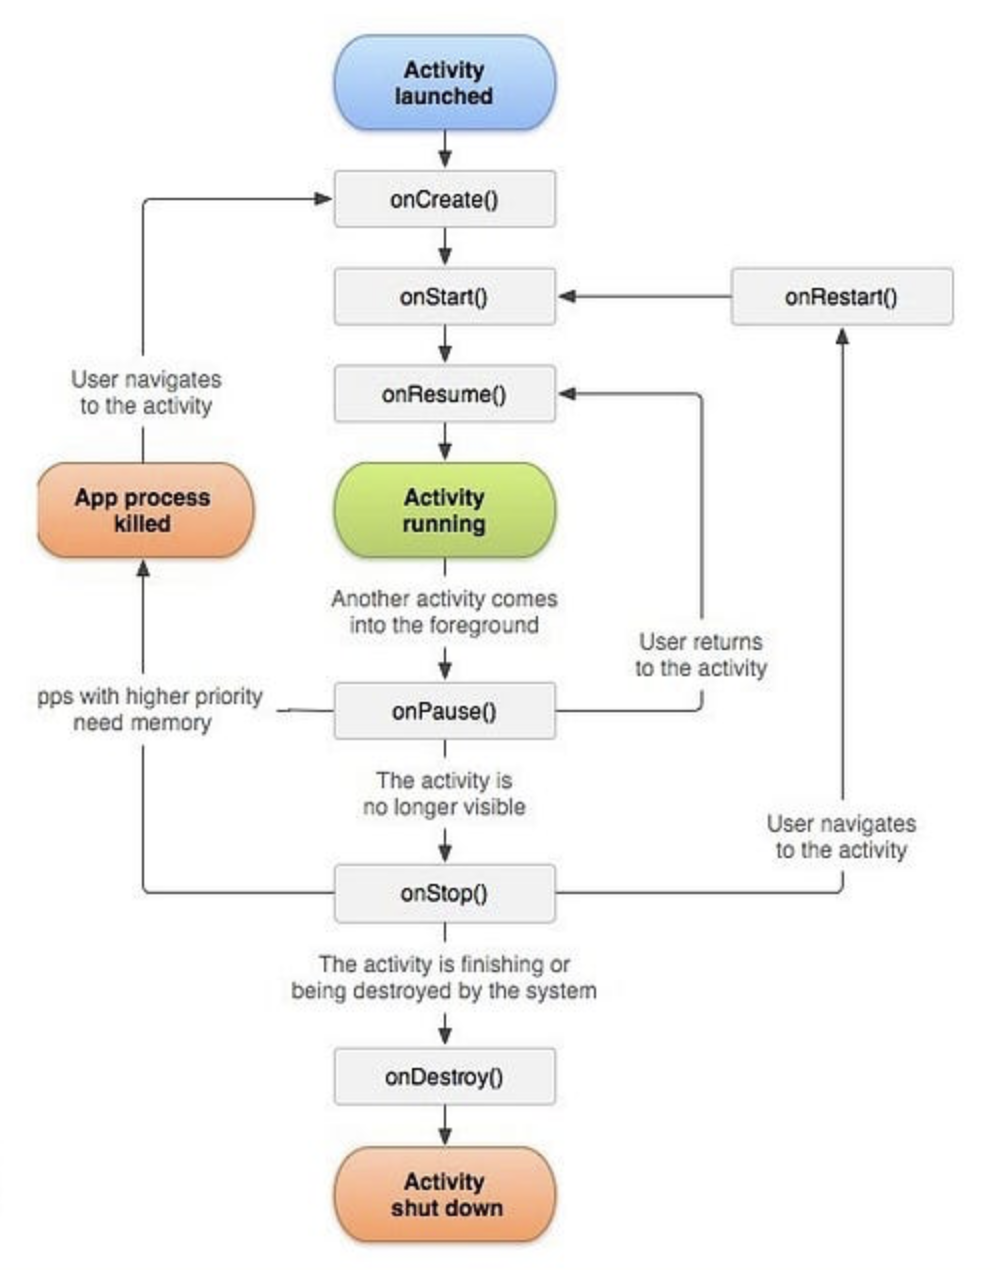
The activity lifecycle involves several callback methods that you can override to perform actions at specific points in the activity's life:
- onCreate(): Called when the activity is first created. Use this to initialize the UI, load data, etc.
- onStart(): Called when the activity becomes visible to the user.
- onResume(): Called when the activity is ready to interact with the user.
- onPause(): Called when the activity loses focus but is still partially visible. Use this to save data, stop animations, etc.
- onStop(): Called when the activity is no longer visible to the user.
- onRestart(): Called after onStop() when the activity becomes visible again.
- onDestroy(): Called before the activity is destroyed. Use this to release resources.
Activity States
Based on these methods, activities can be in several states:
Active (Resumed): The activity is in the foreground and interacting with the user.
Paused: The activity is partially obscured by another activity but still visible.
Stopped: The activity is completely hidden and not visible to the user.
Destroyed: The activity is finished and no longer exists.
How Activity lifecycle behaves on system events:
Screen Orientation Changes (Configuration Changes)
Activity Recreation: The activity is destroyed and recreated with the new configuration.
Data Preservation: Use onSaveInstanceState() and onRestoreInstanceState() to save and restore UI state.
Resource Optimization: Reload resources (layouts, images) as needed.
Low Memory
Activity Destruction: The system may kill less important activities to free up memory.
Resource Release: Activities should release resources (like large bitmaps) to help the system.
Lifecycle Methods: onLowMemory() is called, but it's not guaranteed to be called before the process is killed.
Battery Low
Background Limitations: The system may restrict background activities to conserve battery.
App Behavior: Adjust app behavior accordingly, such as reducing network usage or background tasks.
User Notification: Inform the user about battery status and offer options to optimize usage.
Incoming Calls
Activity State: The current activity is usually paused, but it can be stopped or destroyed depending on the call duration and system conditions.
Data Preservation: Use onSaveInstanceState() to save data before the activity is potentially destroyed.
User Experience: Provide a smooth transition back to the app after the call ends.
User Switching Apps
Activity State: The current activity is usually paused or stopped.
Resource Management: Release unnecessary resources to improve system performance.
Data Preservation: Save data as needed to restore the app's state when the user returns.
How ViewModel can help here:
ViewModel is a crucial component of the Android Architecture Components that significantly simplifies managing UI-related data across activity and fragment lifecycles.
- Survives Configuration Changes: Unlike activities, ViewModels outlive configuration changes (like screen rotations). This means your data persists, preventing unnecessary data reloading and UI updates.
- Data Sharing: You can share data between fragments and activities using a shared ViewModel, promoting code reusability and data consistency.
- Decoupling: By separating data logic from the UI, ViewModels improve code organization and testability.
- Lifecycle Awareness: While ViewModels aren't directly lifecycle-aware, they work seamlessly with LiveData to react to lifecycle changes, ensuring data is updated only when necessary.
Bonus:
Activity Lifecycle Observer from Application Class
class YourApplication : Application() {

    override fun onCreate() {
        super.onCreate()
        registerActivityLifecycleCallbacks(CustomLifecycleCapture(this))
    }
}

open class YourLifecycleCapture(private val applicationContext: Context) : Application.ActivityLifecycleCallbacks, NudgeGlobalCallback {

    override fun onActivityCreated(activity: Activity, savedInstanceState: Bundle?) {
        super.onActivityCreated(activity, savedInstanceState)
        // Your code here for when an activity is created

    }

    // Other lifecycle callback methods...

    override fun onActivityDestroyed(activity: Activity) {
        super.onActivityDestroyed(activity)
        // Your code here for when an activity is destroyed
    }
    override fun onAppForegrounded() {
        // Your code here for when the app comes to foreground
    }

    override fun onAppBackgrounded() {
        // Your code here for when the app goes to background
    }
}
Closing words
Understanding the Android lifecycle is a fundamental skill for any Android developer. It empowers you to create robust, efficient, and user-friendly applications. This article explored the lifecycles of both the Application class and Activities, along with how they react to various system events.
I hope this article provided a comprehensive overview of Android lifecycles. Happy coding!🧑💻